Showing posts with label Recipes. Show all posts

Friday, October 31, 2014

Cannoli Spider Ball - A Halloween Favorite!

So this was one of the crowd favorites from last year's Halloween Party. I mean really, who doesn't love cannoli dip? This is a super easy dessert that anyone can make, very few ingredients, and tastes delish. That's my kind of dessert.


Ingredients:

- 1 8oz. brick of cream cheese, room temp.
- 1 stick of unsalted butter, room temp.
- 3/4 cup powdered sugar
- 2 tbs brown sugar
- 1/2 tsp vanilla
- A handful of mini chocolate chips
- 1/2 bag of Oreos, crushed - plus two whole cookies for the eyes
- 2 hershey kisses
- 1 box of cannoli chips (or) sweet pita chips
- 8 black pipe cleaners


Directions:

- Cream together the cream cheese and butter
- Add in both sugars and vanilla, mix until well blended
- Fold in the mini chocolate chips
- Place cream cheese mixture in the freezer for an hour
- Once frozen, shape into a 1/2 sphere onto a plate
- Top ball with the crushed Oreos
- Open the two Oreos making sure that the white cream part is still attached to one side
- Use this side of both Oreos as eyes - just push the cookies slightly into the ball, they should stick on their own, or you could save a bit of the cream cheese mixture and use that as glue to stick them on
- Cut the pointed tops off of two Hershey Kisses with a knife (be careful, this is the only tough part - I cut my finger pretty bad last year which wasn't fun) and push them into the whites of the Oreo eyes
- Bend the pipe cleaners 3/4 of the way up, cut them if need be to fit on the plate you are using
- Add the 8 pipe cleaners to the cheese ball, 4 on each side 
- Then just surround the ball with your chips and you are done!

Easy right?!

Here's what is looked like before I added the chips, just so you can see the size. 

Happy Halloween Everyone!
JP

Wednesday, October 22, 2014

A Spook-tacular Halloween!

It's hard to believe that Halloween is only a week and a half away! Where did the time go? For those of you on Pinterest, I am sure that your feed is blowing up with different Halloween-themed treats and different decor ideas. Well, I realized the other day that I never posted pictures from our Halloween party last year so I figured I would post about it now before Halloween so hopefully it will inspire those of you trying to throw your own Spook-tacular Bash and give you a few more ideas that might not be on Pinterest. Or at least not yet : )

Last year H and I threw a big party for our friends and co-workers to celebrate and yes, everyone came in costume! H was Dexter and I was one of his victims wrapped in plastic. We also wrapped the entire garage in plastic to act as a kill room - very Dexter like - and this space doubled as a beer pong area for the party. For those who have never seen Dexter, sorry you are seriously missing out. I think it might be on Netflix so I would recommend checking it out. But, for those who have seen the show,.. great costume idea right?!

Anyway, here is what we made and what a few people brought to the party:


1 - Monster Fingers - I am a HUGE fan of chocolate covered pretzels; there is just something about that salty/sweet combo that gets me every time! Thank's Kim for bringing those!

2 - A Mouse Infested Cheese Plate - brie, cranberry goat cheese, garlic herb, cheddar, and H's favorite pepper jack, all complete with some pepperoni, olives, and dried fruit - yum!

3 - Mummy Cake Pops - A huge crowd pleaser! Though I cannot take credit for these, a co-worker and friend of mine makes pops for every occasion and these were perfect.

4 - Homemade Pizza Jack O'Lantern and Eye Ball - Yea, these were creepy looking, but oh so delicious. Get the dough recipe here!


5 - Mini Mummy Dogs - can't go wrong with pigs-in-a-blanket, or as we call it in my family - Piggin's.

6 - Buffalo Chicken Throw Up - Ugh, now this was seriously gross looking, but wow, was it tasty! My girlfriend from college makes this dip and after getting the recipe from her and botching it on New Years I tried it again and I think it turned out pretty good!

7 - Deviled Egg Eyeballs and Spiders - Another co-worker of mine brought these. They were all gone by the end of the night!

8 - Cannoli Dip Spider Ball - Now this was a crowd pleaser! I will post the recipe for this amazing dip at some point this week though I don't have any other pictures. It is soooo unhealthy, but oh so good! And even better as a creepy spider!

There you have it, everything you need to make one awesome Halloween party spread. There were a handful of other things that people brought and a few things I made, but over all, these were my favs. Hopefully these ideas have given you an idea of how to create a memorable Halloween Bash!

Happy Haunting!

JP

Tuesday, September 9, 2014

CSA 2014

So I realized today that I never mentioned our CSA share this year (you can find last year's posts here and here). I don't know how it slipped my mind considering I go every week and have been going since May! Anyway, this year there have been some ups and downs with the farm we belong to. Some produce has been great. Like the strawberries in the Spring, they were amazing. We easily picked 10 quarts of berries over the course of only a few weeks. So much so that I made berry muffins (protein ones that really didn't turn out all that great) and a strawberry pie that was delicious! I haven't posted about that though because the photos are on my camera - cue sad face.

Some produce has taken a while to come around like the tomatoes. This is our first week of getting more than a pound or two of tomatoes. I think this summer has been cooler than normal (trust me I'm not complaining) which is making the produce peek later in the season. I could be totally off base here but that's the only thing I can think of that would have pushed the "big" produce weeks back a month. I mean it is September, right? So why did we get almost 10 lbs of tomatoes this week and virtually none in August?

So here is what our share looked like this week (sorry for the subpar iphone photo):


- 1 large watermelon
- 3 bell peppers
- 1 head garlic
- 4 hot peppers
- 1 large yellow squash
- 2 zucchini
- 1 eggplant
- 1 bunch of celery
- 2 quarts of stewing/Roma tomatoes
- 1 quart of raspberries
- 1 pint green beans
- 1/2 pint yellow cherry tomatoes
- 1/2 pint tomatillos
- 1 1/2 pints red grape tomatoes
- 1 head of lettuce
- 3 lbs heirloom tomatoes
- 5 lbs (yup 5!) beef steak tomatoes

Plus 60 stems of wild flowers and 6 sunflowers. Needless to say, it was a great week to be a CSA member! Now I just have to figure out what to do with all those tomatoes. Any suggestions?

JP


Friday, August 8, 2014

It's My Blogiversary!

It's been one year! One whole year of blogging! I can't believe how fast the time flies. This year was a great year for us. We got so much done in the house and managed to keep our sanity (and some money in our pockets). Looking back, I now remember why I started this blog - to have an outlet for everyday life. I also wanted to write about our home progress in hopes it would be a way to hold myself accountable for continuing to do stuff around the house. It is so easy to put things off and then before you know it, BAM, a year has gone by and nothing has gotten done. The opposite is also true though, that if you move too fast you could make bad decisions or wind up spending more than you needed to. For us, I think we have found a happy medium (that leans towards the quicker-paced side) and it works for us. Everyone is different.

Moving into a new construction home has also allowed us to start with a blank canvas, but this, like everything else, has its ups and downs. We have done some smaller projects and some bigger ones this year, always inching closer to the final product. Seriously though, who am I kidding? It will never be "finished". Having a home is like having a never ending to-do list. Slowly, but surely, it will get there. One project at a time. H and I are just enjoying the ride. Annnd cookin' up some good eats in the mean time : )

So here is a list of my top five posts from this first year of blogging. Enjoy!

  1. Life Under Construction - This is where is all started. Building our house from the bottom up was a great experience. It was so exciting to see the progress each week as we inched closer to home ownership. 
  2. First Year in Review - I have a sweet spot for this post, mainly because of my love for lists. Though I have only been blogging for a year, H and I have been in the house for almost two now so we were doing projects before The JP Project even got started. It was so great to see everything we accomplished in the first year of owning our home and was a great way to see just how far we have come.
  3. Our Crowning Achievement - In this post H and I (mainly H) tackled a huge project in our home, the living room. H had to have surround sound and I had to have character. The solution - crown molding : ) This was our first attempt and we really learned a lot through the process so next time it will hopefully run a little smoother.
  4. The Final CrossFit Friday - I chose this post because I am so very proud of H and I for accomplishing this goal. We had been wanting to try CrossFit for a while and in this post I talked about how we made it through the into-classes and graduated onto the real deal. I seriously need to write an update one of these days because we are still at it and working harder than ever!
  5. Red Velvet Crinkle Cookies - I couldn't have a Top Five without my all time favorite cookies! These are seriously the best. Stop reading my blog and just go make them. Like now ; )

Well, there you have it. Five of my favorite posts from this first year of blogging. It was really hard to narrow it down but I think these are a few good stand-out posts. If you enjoyed reading them I hope you continue to follow me here at The JP Project. This next year is already shaping up to be one of the best yet!

Thanks everyone for reading and supporting my blog!
JP

Monday, June 9, 2014

Chocolate Dipped Almond Biscotti

This was my first attempt at making biscotti and I think they turned out great! After searching the Internet for an easy to follow recipe that didn't involve a ton of ingredients I came across this one from Joy of Baking. These homemade biscotti really are delicious and even though the recipe made about 20 cookies, they were gone in a matter of days!


One thing I love about biscotti is how well they go with my morning coffee. Nothing is better than sitting on the front porch on a cool morning, in my oversized Penn State sweatshirt with a warm cup of coffee and homemade chocolate biscotti. Seriously, it's the best. It's even better when Pepper is fast asleep at my feet, but that rarely happens. She is usually tearing something up in the yard or chasing bees. What a trouble maker she is!


I have to admit that these biscotti are very simple, not plain, just simple. They have a light almond flavor but, that paired with the chocolate makes for a delicious biscotti. That being said, I think next time I am going to try something different. Maybe add chopped almonds, or dried fruit. Maybe even some chocolate chunks, something to add some texture and added flavor.


Ingredients: 

- 3 large eggs
- 1 tsp pure vanilla extract
- 1/2 tsp pure almond extract
- 2 cups flour
- 3/4 cup sugar
- 1 tsp baking powder
- 1/4 tsp salt
- 6 oz semi-sweet or dark chocolate, finely chopped or as chips
- Parchment paper

Directions:
(I know this seems like a lot of steps, but I promise it is super easy!)

- Preheat oven to 300 degrees and line a baking sheet with parchment paper
- Wisk the eggs and the two extracts together in a small bowl
- In a separate bowl, wisk together the flour, sugar, baking powder, and salt.
- optional: you could stir in a few chopped, toasted almonds into the flour mixture at this point or dried fruit to give the biscotti more texture
- Add the egg mixture to the flour mixture and stir until a dough forms
- Lightly flour your surface
- Divid the dough in half and shape/roll into two 7" logs  that are about 3-4" wide
-  Transfer the logs onto the parchment lined baking sheet and bake for about 35 minutes (or until the logs are firm to the touch)
- Remove from oven and let cool on a wire rack for about 10 minutes
- Transfer logs to a cutting board and, using a sharp knife, cut the logs into 1/2" slices on an angle like so:

- Place the slices on the baking sheet and bake for 10-15 minutes, turn slices over and bake for another 10-15 minutes
Note: you want the slices to be firm to the touch so they are nice and crispy
- Remove from the oven and let cool on a wire rack
- Once slices are cooled, melt the chocolate using a double boiler or microwave
- Dip bottom (or side or tip, or the whole thing!) into the chocolate and place on the parchment paper
- Once all slices have been dipped, place the sheet in the refrigerator for about 10 minutes

Biscotti can last several weeks if placed in an airtight container with parchment or wax paper between each layer of cookies. Though like I said, they didn't last long in my house!

Also, if you want, you could slice the loafs into 1/4" slices to make double the amount of biscotti! Just saying : )

That's all for now. Hopefully I will have some house updates in the coming weeks so make sure to check back for those!

JP


Tuesday, April 8, 2014

Shrimp and Orzo - Mediterranean Style

This may be one of the heartiest, yet lightest pasta dishes ever.


There are so many colorful veges that make this so filling, yet the lemon and herb flavor combo lightens up the whole dish, making this a great Summer (or Spring) dinner.


I have to say thank you to our neighbors for introducing us to this great recipe. They had us over for dinner one night and made this dish, though they omitted the feta and olives. H and I both really loved it! Me, I'm not a huge seafood fan but the shrimp in this meal really soaks up the flavor. We liked it so much we asked for the recipe and decided to try it out. 

So months later I finally looked up the recipe, courtesy of Rachel Ray. I changed a few things, mainly the amount of spice, as I didn't have fresh herbs on hand and I used one pound of shrimp instead of two since it was just H and I eating dinner.

Here's the recipe with my tweaks, but if you want to make a full batch of the shrimp just double the marinade or you can check out the original recipe here.

Ingredients:

- 4 cloves garlic, 2 chopped and two crushed
- 1/4 cup extra virgin olive oil, plus 2 tbs. to saute the vegetables
- 2 lemons, 1 very thinly sliced
- 1/2 tsp. crushed red pepper flakes
- 2 tsp. dried oregano
- 1 lb. jumbo shrimp, peeled and deveined
- 1/2 lb. orzo
- 1/2 large red onion, chopped
- 1 green bell pepper, chopped
- 1/2 cup kalamata olives, pitted and chopped
- 1 pint cherry or grape tomatoes, halved
- 1 palm full of dried parsley (about 1 and 1/2 tbs)
- 1/2 lb feta, cubed or crumbled 
- Salt and pepper to taste (go easy on the salt, with the olives and feta it doesn't need much at all)

Directions:

- Bring a pot of water to a boil for the orzo
- Combine the 2 crushed cloves of garlic with the 1/4 cup oil, sliced lemon, red pepper flakes, oregano, and the shrimp; marinade for about 10 min
-  Drop the orzo in the water at the same time you start the veges
- For the veges, heat a medium saute pan over med/high heat and add 2 tbs. of oil 
- Add the onion and bell pepper to the pan and lightly season with salt and pepper, cook for 5 min stirring occasionally
- Heat a large saute pan over high heat, then add the shrimp (they should only take 6-8 min), stir frequently
- While the shrimp in cooking, add the chopped garlic to the veges, toss for a minute, then add the olives and tomatoes, toss together until the shrimp and orzo are finished
- Drain the orzo, add it to the shrimp pan along with the veges
- Add the parsley and feta, season with salt and pepper
- Finish it off with the juice of the remaining lemon and a little extra olive oil

Note: This recipe calls for three pots/pans going at one time. Yup, three. Timing is crucial here. This is an easy recipe as long as you keep an eye on the clock and don't overcook your shrimp. 

Even though I am not a huge seafood fan, I really love this recipe. You could even sub out chicken instead. Rachel Ray's recipe allows for either to be used and I am sure using chicken would be just as good. Oh, and leaving out the feta and olives really makes for a flavorful dish too, so if those strong flavors aren't your thing, leave 'em out. This one is still a winner!


Tuesday, February 18, 2014

Red Velvet Crinkle Cookies


This post is something that I was going to blog about a while ago, back during the Holidays, but never really got around to it. I am a believer of living life not just writing about it, so when the time came to post this I was just too busy getting us ready to go to Florida for Christmas.  Needless to say, the post never happened and these beautiful pictures went to the wayside. However, since I am anxiously awaiting my new hard drive, I figured this would be a good one to tide readers over for a little while. 

Oh, and note to self... while these cookies are seriously amazing, they do not keep very well in a hot car for a two day drive. We got to Florida and they were complete mush, still delicious, but not nearly as pretty as they are here : ) Enjoy!

-----

These might just be my favorite cookies...


So gooey and delicious.


Of course, very festive for the Holidays.


and seriously super easy to make!

I got this recipe somewhere on the Food Network website, however, it was for chocolate crinkle cookies, not red velvet. For those who don't know, I am a sucker for anything red velvet : ) My amazing girlfriends even ordered me red velvet cupcakes for my Bridal Shower from my favorite bakery in the city - Martha's. Oh, that place seriously Heaven. It's this little hole in the wall store in the middle of Forest Hills, Queens. And yes, it is so worth the trip out to Queens. I am still grateful they were able to make that happen, love you ladies! 

They know that red velvet is top on my list of favorites, and after making these cookies, it will most certainly be on yours too! Like I said, this recipe originally called for chocolate in the form of a cake mix. I have made the chocolate version too and the cookies are really good, just not nearly as good as these (in my biassed opinion). Ok here goes,...

Ingredients: 

- 1 brick of cream cheese (8 oz)
- 1 stick butter at room temp (unsalted)
- 1 egg
- 1 tsp vanilla
- 1 box moist red velvet cake mix
- a bunch of powdered sugar to roll the cookies in and for dusting (yea, I know not too technical sorry!)

Directions: 

- Cream together the cream cheese and butter until smooth
- Beat in the egg and then the vanilla extract
- Beat in the cake mix (you can just dump it in all at once, but just be sure to watch for fly aways)
- Cover dough and refrigerate for at least 2 hrs
- Preheat oven to 350
- Roll dough into tbs sized balls and then roll them in a bowl of powdered sugar making sure to cover completely
- Place balls on an ungreased cookie sheet, a inch or two apart, and bake for 12 minutes
- Cool on a wire rack and then sprinkle with extra powdered sugar if needed

Note: the cookies will look slightly underdone when you take them out of the oven, this adds to the fudge-like gooey deliciousness!

Enjoy!
JP

Tuesday, January 21, 2014

Spicy Three Bean Chili

On a cold day like today, nothing is better than a big pot of chili! After searching long and hard for a good chili recipe I just decided to combine a bunch of different ones I found online to make my own and sure enough, this one is a winner!


This recipe calls for two different types of meat - ground beef and ground turkey breast. I tend to use both in every meat dish (like meatloaf, meat balls, etc.) just to keep it on the healthier side. But feel free to use just beef or even try something else. Chili is one of those dishes that you can really swing any which way you want. If this is too spicy for you, cut back on the heat and add more italian flavors like rosemary and oregano. You can even add more veges to it too. The options are endless. Oh how I love chili : )

And of course you have to have all the fixin's like sour cream and grated cheddar cheese. Some people like to add onions, but I prefer chopped chives or scallions. Not just for taste, but the green really stands out against the other colors - people do say you eat with your eyes first, right?


Ingredients: 

- 1 cup diced white or yellow onion
- 1 red bell pepper, diced
- 1 green bell pepper, diced
- 1 cup diced carrots (about 2 large)
- 1 tbs ground cumin
- 1 can diced tomatoes with green chilies or jalapeno (or plain works too)
- 2 cups water
- 1 tbs chili powder
- 1 to 2 tsp cayenne
- 1 tsp dried oregano
- 1/2 lb lean ground beef
- 1/2 lb ground turkey breast
- 2 chipotle chilies in adobe sauce (you can leave out the seed if you like, though I add 'em in)
- 1 tbs adobe sauce from the can of chilies
- 1 can black beans, drained and rinsed
- 1 can red kidney beans, drained and rinsed
- 1 can white beans, drained and rinsed
- 1-2 tbs olive oil
- Salt and pepper
- Sour cream  (optional garnish)
- Cheddar cheese, grated  (optional garnish)
- Chives, scallions, or red onion (optional garnish)

Directions: 

- Heat the olive oil in a large pot or dutch oven (I prefer dutch ovens for braising and stews as they help to keep the heat even throughout the cooking process; great for low and slow dishes)
- Add the onion, bell peppers, and carrots, cook until soft (~10 min)
- Add the cumin and cook, stirring for about a minute
- Add the ground beef and turkey, break up the meat and cook on high until no longer pink
- Add the other dry spices
- Add the can of diced tomatoes, water, chilies in adobo and the additional adobo sauce, salt and pepper
- Simmer, partial covered, for about 30 minutes stirring occasionally
- Add the beans, continue to simmer, partially covered, for another 20 minutes
- Season with salt and pepper to taste
- Garnish with sour cream, cheese, and chives - Enjoy!

This dish goes great with a side of corn bread or muffins too! Check back later for that recipe,.. I promise it's a good one : )

Happy Snow Day!
JP


Monday, December 23, 2013

Oreo Truffles

... has a nice ring to it don't you think?


These taste even better than they sound. Three ingredients, no baking, and delicious. Perfect. The best part, other than the no baking, is that you get to alleviate some stress by crushing all those Oreos into crumbs with a frying pan. Or you could use a food processor, but where is the fun in that?

Ingredients: 

- 1 package of Oeros, crushed
- 1 brick cream cheese, room temperature
- White melting chocolate, I use 2 bags of melting chips that you can get from Michael's or any craft store
- Colored melting chocolate or dark chocolate chips (optional)


Directions:

- Cream the cream cheese and then mix in the Oreo crumbs
- Put the dough in the refrigerator for at least an hour to harden
- Remove dough from the frig and roll into tbs sized balls
- Melt about half a bag of chocolate in the microwave using directions on bag
- Dip the balls into the melted chocolate (I like to use toothpicks for this)
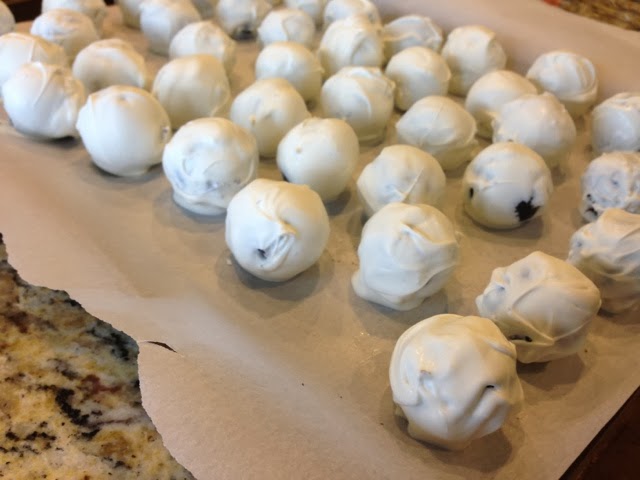
- Place them onto wax or parchment paper and allow to dry
- Continue melting chocolate as needed and coat each of the Oreo balls


They go from looking like this... 


To this...


- Here is the optional part, if you have a different colored chocolate or even some chocolate chips laying around you can melt them and then drizzle over the top of the truffles, or you could add colored sprinkles before they harden. The options are endless!


Don't these look great? And they make a wonderful Christmas gift for co-workers or neighbors too.

Happy Cookie Making!
JP

Sunday, December 15, 2013

Cinnamon Buns (Semi-homemade)

What goes better with a snowy Sunday morning than glazed cinnamon buns and a warm cup of coffee? Nothing. Seriously, what could be better?


I had a left over Pillsbury Dough Sheet from a three pack I bought at BJ's, so like anything else I don't know what to do with - I Googled it! : ) Needless to say, hundreds of ideas popped up but one that caught my eye was to make cinnamon buns. Who doesn't love a gooey, delicious bun in the morning? 


After searching through about a dozen recipes I decided to combine a few things from each one. I just made them my own and man did they turn out awesome! These bad boys are semi-homemade which is always a win in my book. Trying to make real, bakery style, homemade cinnamon buns is a lot of work, so by using the pre-made dough sheets, it saved a ton of time. They were even ready by the time H came in from shoveling the driveway and sidewalk making him a very happy Hubby : )

Just a fair warning: I didn't really measure anything, I just eye-balled it. This isn't an exact science so if you happen to like more of something than throw some more in, or if you don't have brown sugar, use white instead. You could also add some pecans or walnuts! I promise, they will still be delish!


I started by rolling out the dough sheet and spreading on some butter (or you can use margarine). Sprinkled some cinnamon, brown sugar, and white sugar on the dough until it was coated. I also added a tbs or two of butter to a pie dish, melted it in the microwave, and then added some cinnamon and brown sugar. 

Then, I just rolled up the dough sheet and cut it into eight equal pieces (I cut it in half, then half again, then half again). Just do the best you can with this since the ends will be a bit wonky looking. And be sure to use a serrated blade here, trust me, it will make cutting the dough way easier!

Next, place the buns into the pie pan, make sure to separate them a bit as they will puff when cooking. Pop them in a 350 degree oven for about 15 mins or until golden brown. 


I also topped these with a simple glaze made from some powdered sugar and milk. Again, I just eye-balled it but a good approximation is about 3 tbs. powdered sugar and 1 tbs. milk, mix together until a nice slurry is formed. You can always add more sugar if it's too runny or more milk if it's too thick. I also added a few drops of vanilla extract for extra flavor. 


These buns won't last long, so if you are hosting a crowd (or have more than two people eating with you) then you might want to make a double batch. Yes, they are that good!

Happy Sunday Everyone!
JP

Friday, December 6, 2013

Roasted Vegetables - Thanksgiving Made Easy

So I hope everyone had a wonderful Thanksgiving! I know it was last week but I wanted to share this super easy recipe that I made this year using random veges we had from our CSA {part 2}. 


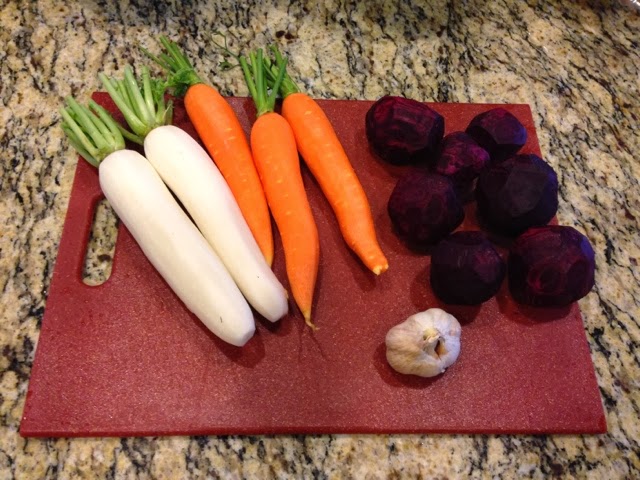
These beauties are all root vegetables: Daikon Radishes, Carrots, and Beets, with of course, some garlic thrown in for good measure : ) But, you could really use any hearty vegetables. I like to throw in some sweet potatoes when I have them or turnips. 


I just chopped these bad boys up and threw them in a roasting pan with whole cloves of garlic, tossed them with some olive oil, salt, pepper, and dried herbs (I used rosemary and thyme, but you can really use just about any seasoning) and Voila... a healthy alternative to the candied carrots and sweet potato casserole loaded with butter and sugar. Now, don't get me wrong, I love those dishes as much as the next person, but it is always nice to have a healthier (and vegan, yay!) alternative.


The beets really give this dish a nice color and create a sweet balance for the tangy radishes. This made plenty of food for a handful of people with very few ingredients and it was super easy. That's my kind of Thanksgiving side dish!

Happy Belated Thanksgiving Everyone!!
JP

Monday, December 2, 2013

Cheddar Ale Soup

Cheddar cheese and beer, what could be better? Another keeper from my Soup of the Day book (in case you can't tell, it is one of my favorite cook books). I paired it with some good crusty bread but I think it would be perfect with some pretzels and an ice cold beer.. mmm. I haven't tried to make my own pretzels yet, but a girlfriend of mine did one night we were hanging out and man were they good! We had different German beers and dips for the pretzels, the only thing that night was missing was this soup!


Ingredients:

- 1/2 cup unsalted butter (4 oz.)
- 1 leek (pale green and white parts) thinly sliced
- 1 carrot, peeled and diced into 1/2 inch pieces
- 1 celery rib, diced into 1/4 inch pieces
- 1/2 cup flour
- 1/2 tsp. dry/ground mustard
- 4 cups chicken broth (must be chicken, I wouldn't sub vege for this one)
- 1 bottle of a good ale (New Castle or Bass was recommended)
- 2 cups shredded sharp cheddar cheese
- 1/4 cup grated Parm (or any other hard cheese like Romano would work)
- Pinch of cayenne pepper
- 1 tsp. worcestershire sauce
- Salt and freshly ground pepper

Directions:

- In a large pot, melt butter over medium heat
- Add the leek, carrot, and celery, saute until soft, about 10 minutes


- Season with salt and pepper, then stir in flour and mustard
- Cook for about a minute until incorporated
- Add the broth and ale, bring to a simmer over high heat


- Reduce heat to medium and cook, whisking to break up any flour clumps, for 5 minutes or until thickened slightly
-  Add the cheeses and whisk constantly until completely melted, 3-5 minutes


- Note: Don't let the soup boil or it might wind up stringy - not good
- Stir in the cayenne and worcestershire, season with a little salt and pepper before serving


Enjoy!
JP

Monday, November 25, 2013

Eggplant Parm - An Experiment

My husband and I both dislike hate eggplant. We avoid it at all costs. But when we started getting them from the CSA (CSA Part Two) I just couldn't see not at least trying to do something with them to make them more edible. So what better way to make something taste better than fry it up and cover it with cheese?!

I have made Chicken Parm a hundred times. I don't do anything special, just bread it using a three step process, pan fry to get it golden brown, and then finish it in the oven with sauce and mozzarella. Simple. Time consuming, but simple. I figured, why not try to do the same thing with the eggplant. I was just getting started and had to take the dog out, started up a conversation with our neighbor (whom we get alone so well with, definitely lucked out there!) and they were saying that the key to getting that bitter taste out of the eggplant is to squeeze out the juice. Who knew?! So I put a weight on the slices and let it sit for a little while. They told me to let it go for an hour or two, an hour or two I did not have. So I just did my best and it seriously made all the difference!

I started by slicing the eggplant really thin and let it sit for a little while on paper towels with a weight to extract the juice...


Then breaded and pan fried... 


After, it looked like this, much more appealing...


I added some sauce and fresh mozz...


Cooked it in the oven for about 20 minutes at 350, made some spaghetti and voila...


I think it turned out pretty good! And so did my husband.. win, win!


Just goes to show you that you may think you don't like something but if you change it up (or get some advice from a friend) you may just surprise yourself!

JP

Saturday, November 16, 2013

Chicken Tomatillo Soup with Chipotle Chiles

My husband loves spicy food. Yup, loves. And me, well, I enjoy spicy, just not so much so that I can't enjoy the rest of my meal. So when we got an unlimited amount of tomatillos from our CSA (oh, and check out Part 2) I knew I had to try out this recipe from my Soup of the Day book. I have tweaked the original recipe a little by adding a few things to beef it up.


Warning: this soup is spicy, but it has a great fresh flavor that really balances out the heat


Ingredients:

- 8 cups chicken broth
- 1 1/2 lbs skinless, boneless chicken breast halves (I just used 4 breasts since that is what I had)
- 1 oregano sprig
- 10 cilantro sprigs
- 9 cloves of garlic
- 1 lb tomatillos, husked, rinsed, and chopped coarsely
- 1 white onion, chopped
- 2 large chipotle chiles in adobe, minced, plus 1 tbs adobe sauce
- 1 1/2 tbs canola oil
- 3 tsp lime juice (preferably fresh)
- 1 ripe avocado (garnish, though I didn't have one so I skipped it)
- Tortilla strips (garnish, skipped this too)
- 1 1/2 cups grape or cherry tomatoes, quartered
- 1/2 lb cotija or feta cheese crumbled (I used cheddar)
- 1 cup corn (frozen or fresh)
- 1 can black beans, drained and rinsed
- Salt and freshly ground black pepper

Directions:

- In a large pot, combine broth, chicken breasts, oregano, cilantro, and 3 garlic cloves, bring to a boil


- Reduce heat to low, cover and simmer until chicken is cooked through (15-20 min)
- Transfer chicken to a plate and strain broth into a large heat proof bowl, discard the solids
- Wipe out the pot and set aside, then shred the chicken into bite sized pieces
- In a food processor (or blender) combine tomatillos, onion, chipotle chiles, adobe sauce, and remaining 6 cloves of garlic, process until a smooth paste


- In the clean pot, heat the oil over high heat, then add the tomatillo mixture and fry, stirring occasionally until the liquid evaporates (the color will be darker and the mixture will be very fragrant, about 15 min)
- Add the broth and bring to a simmer
- Cook, stirring occasionally for about 10 minutes
- Add 1 1/2 tsp salt (yes, I know this sounds like a lot, but it needs it, especially if you use low sodium broth), lime juice, shredded chicken, and pepper to taste
- Add corn and black beans
- Simmer until the chicken, corn, and beans are heated through (5 min)
- While the soup is heating through, prep your garnishes


- Serve and Enjoy!


Happy Cooking!
JP

Saturday, November 2, 2013

Garlic Croutons - Yea, these are good!

These garlic croutons are a great option to make if you have some day old bread (or 3 day, in my case) to just use it up instead of letting it go moldy and having to throw it out. Plus, they are delicious so that's an even better reason to try out this recipe!

Ok here goes,...

Ingredients:

- 3 to 5 thick slices of crusty italian style bread
- 3 tbs olive oil
- 2 cloves garlic, crushed or sliced


Directions: 

- Cut bread into bite-sized cubes


- Heat oil and garlic in a saute pan until garlic starts to brown


- Discard garlic and add bread cubes
- Fry bread, stirring often until golden brown (5 min)


That's it! It is seriously really easy to make and they are great as a garnish in soups, on salads, or even just as a snack : )

Enjoy!
JP

Saturday, October 19, 2013

Broccoli Leek Soup

This soup (from Williams Sonoma's Soup of the Day) is so flavorful and if you love broccoli as much as I do you will love it! It is so easy to make and requires very few ingredients which is definitely a bonus. You could always change it up too and add some sharp cheddar cheese on top and pop it in the broiler.. mmm.


Ingredients:

- 2 tbs olive oil
- 2 leeks (white and pale green parts) finely chopped
- 1 1/2 lbs broccoli (I just so happened to have 4 heads from the CSA, so that's what I used) florets and peeled stems cut into 1 inch pieces 
- 4 cups chicken broth (or you could use vege to make it vegetarian!)
- Salt and Pepper
- Sour cream for garnish  
- Chives (optional - I didn't have any so I didn't use it)
- Garlic croutons (optional - You can either buy them or make your own)


Directions: 

- Warm oil over medium heat
- Add leeks and saute until softened (3-5 min) 
- Add broccoli and saute until slightly softened (2 min)


- Add broth and bring to a simmer 
- Cover partially and cook until veges are tender (15-20 min)


- Remove from heat and let cool slightly
- Working in batches puree soup until smooth (or use your immersion blender!)
- Season with salt and pepper, garnish and serve!


Enjoy!
JP