Monday, December 23, 2013

Oreo Truffles

... has a nice ring to it don't you think?


These taste even better than they sound. Three ingredients, no baking, and delicious. Perfect. The best part, other than the no baking, is that you get to alleviate some stress by crushing all those Oreos into crumbs with a frying pan. Or you could use a food processor, but where is the fun in that?

Ingredients: 

- 1 package of Oeros, crushed
- 1 brick cream cheese, room temperature
- White melting chocolate, I use 2 bags of melting chips that you can get from Michael's or any craft store
- Colored melting chocolate or dark chocolate chips (optional)


Directions:

- Cream the cream cheese and then mix in the Oreo crumbs
- Put the dough in the refrigerator for at least an hour to harden
- Remove dough from the frig and roll into tbs sized balls
- Melt about half a bag of chocolate in the microwave using directions on bag
- Dip the balls into the melted chocolate (I like to use toothpicks for this)
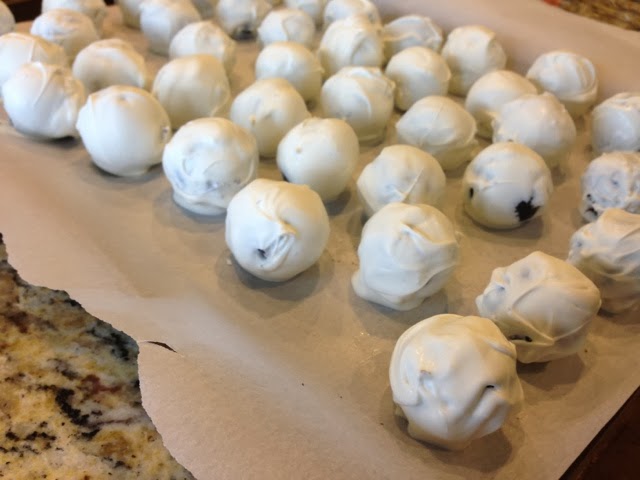
- Place them onto wax or parchment paper and allow to dry
- Continue melting chocolate as needed and coat each of the Oreo balls


They go from looking like this... 


To this...


- Here is the optional part, if you have a different colored chocolate or even some chocolate chips laying around you can melt them and then drizzle over the top of the truffles, or you could add colored sprinkles before they harden. The options are endless!


Don't these look great? And they make a wonderful Christmas gift for co-workers or neighbors too.

Happy Cookie Making!
JP

Sunday, December 15, 2013

Cinnamon Buns (Semi-homemade)

What goes better with a snowy Sunday morning than glazed cinnamon buns and a warm cup of coffee? Nothing. Seriously, what could be better?


I had a left over Pillsbury Dough Sheet from a three pack I bought at BJ's, so like anything else I don't know what to do with - I Googled it! : ) Needless to say, hundreds of ideas popped up but one that caught my eye was to make cinnamon buns. Who doesn't love a gooey, delicious bun in the morning? 


After searching through about a dozen recipes I decided to combine a few things from each one. I just made them my own and man did they turn out awesome! These bad boys are semi-homemade which is always a win in my book. Trying to make real, bakery style, homemade cinnamon buns is a lot of work, so by using the pre-made dough sheets, it saved a ton of time. They were even ready by the time H came in from shoveling the driveway and sidewalk making him a very happy Hubby : )

Just a fair warning: I didn't really measure anything, I just eye-balled it. This isn't an exact science so if you happen to like more of something than throw some more in, or if you don't have brown sugar, use white instead. You could also add some pecans or walnuts! I promise, they will still be delish!


I started by rolling out the dough sheet and spreading on some butter (or you can use margarine). Sprinkled some cinnamon, brown sugar, and white sugar on the dough until it was coated. I also added a tbs or two of butter to a pie dish, melted it in the microwave, and then added some cinnamon and brown sugar. 

Then, I just rolled up the dough sheet and cut it into eight equal pieces (I cut it in half, then half again, then half again). Just do the best you can with this since the ends will be a bit wonky looking. And be sure to use a serrated blade here, trust me, it will make cutting the dough way easier!

Next, place the buns into the pie pan, make sure to separate them a bit as they will puff when cooking. Pop them in a 350 degree oven for about 15 mins or until golden brown. 


I also topped these with a simple glaze made from some powdered sugar and milk. Again, I just eye-balled it but a good approximation is about 3 tbs. powdered sugar and 1 tbs. milk, mix together until a nice slurry is formed. You can always add more sugar if it's too runny or more milk if it's too thick. I also added a few drops of vanilla extract for extra flavor. 


These buns won't last long, so if you are hosting a crowd (or have more than two people eating with you) then you might want to make a double batch. Yes, they are that good!

Happy Sunday Everyone!
JP

Wednesday, December 11, 2013

Butler's Pantry Update!

We have finally got our butler's pantry where we want it - usable! Ever since we painted we have been saying, "we still have to put up those shelves" "we need to get some liquor for the bar area" "we need to get some artwork for the wall" "ugh, I can't wait to use this space and it not be a collector of stuff!".. Ok, the last two were all me : ) but in all seriousness, the space was just a dumping ground for all things without a home. If we didn't know where to put something, it went in the bar area until we found a space for it. And now...


It's done! (more or less)


Don't mind these iPhone photos, I will get some better ones of this area for the House Tour Page, but for now we are both very excited to finally use this space! It still needs some details, maybe a few photos of friends or something, I don't know. We will see how it transforms over the next few months.

The shelves were a purchase for our old apartment that we were able to reuse here. Originally from Pottery Barn, and absolutely perfect for city life, now they have a new home in our new home! They are housing most (but not all) of our wine glasses and other bar glassware, including these super fun glitter stemmed glasses my MOH made for me for my bachelorette party! Love them. We also have these awesome Delirium beer glasses - where we got these will remain a secret - we have been wanting to display, along with our cocktail shaker and decanter. 

Of course we needed to make room for the main event - the wine and liquor! I wouldn't say the bar is stocked, but we have a good start and I am sure we will accumulate different bottles through the years. (That's if our friends don't drink them all first). I was able to get this great wooden tray from Pier1 on sale and it holds everything that doesn't go in the frig or on the shelf nicely.

The large framed chalkboard was a DIY made from leftover hardboard from when H made his own granite template to save a few $$. I will post later of how that came together and a few cute designs I've used for the holidays! Originally I wanted to hang our fingerprint tree in this spot, but after doing some measuring we realized it wouldn't fit. Womp womp.

So for now, this space is done! And man what a difference it has made! This was an open space, nothing in the nook, no character, nada. And now, it's a great transition between the dining room and kitchen that by DIYing did not cost us too much to do!

I am hoping I can find a picture of the actual "before" shot so you can get a better idea of what we started with. But, for now here is the link to when we started this project.

- JP


Friday, December 6, 2013

Roasted Vegetables - Thanksgiving Made Easy

So I hope everyone had a wonderful Thanksgiving! I know it was last week but I wanted to share this super easy recipe that I made this year using random veges we had from our CSA {part 2}. 


These beauties are all root vegetables: Daikon Radishes, Carrots, and Beets, with of course, some garlic thrown in for good measure : ) But, you could really use any hearty vegetables. I like to throw in some sweet potatoes when I have them or turnips. 


I just chopped these bad boys up and threw them in a roasting pan with whole cloves of garlic, tossed them with some olive oil, salt, pepper, and dried herbs (I used rosemary and thyme, but you can really use just about any seasoning) and Voila... a healthy alternative to the candied carrots and sweet potato casserole loaded with butter and sugar. Now, don't get me wrong, I love those dishes as much as the next person, but it is always nice to have a healthier (and vegan, yay!) alternative.


The beets really give this dish a nice color and create a sweet balance for the tangy radishes. This made plenty of food for a handful of people with very few ingredients and it was super easy. That's my kind of Thanksgiving side dish!

Happy Belated Thanksgiving Everyone!!
JP

Monday, December 2, 2013

Cheddar Ale Soup

Cheddar cheese and beer, what could be better? Another keeper from my Soup of the Day book (in case you can't tell, it is one of my favorite cook books). I paired it with some good crusty bread but I think it would be perfect with some pretzels and an ice cold beer.. mmm. I haven't tried to make my own pretzels yet, but a girlfriend of mine did one night we were hanging out and man were they good! We had different German beers and dips for the pretzels, the only thing that night was missing was this soup!


Ingredients:

- 1/2 cup unsalted butter (4 oz.)
- 1 leek (pale green and white parts) thinly sliced
- 1 carrot, peeled and diced into 1/2 inch pieces
- 1 celery rib, diced into 1/4 inch pieces
- 1/2 cup flour
- 1/2 tsp. dry/ground mustard
- 4 cups chicken broth (must be chicken, I wouldn't sub vege for this one)
- 1 bottle of a good ale (New Castle or Bass was recommended)
- 2 cups shredded sharp cheddar cheese
- 1/4 cup grated Parm (or any other hard cheese like Romano would work)
- Pinch of cayenne pepper
- 1 tsp. worcestershire sauce
- Salt and freshly ground pepper

Directions:

- In a large pot, melt butter over medium heat
- Add the leek, carrot, and celery, saute until soft, about 10 minutes


- Season with salt and pepper, then stir in flour and mustard
- Cook for about a minute until incorporated
- Add the broth and ale, bring to a simmer over high heat


- Reduce heat to medium and cook, whisking to break up any flour clumps, for 5 minutes or until thickened slightly
-  Add the cheeses and whisk constantly until completely melted, 3-5 minutes


- Note: Don't let the soup boil or it might wind up stringy - not good
- Stir in the cayenne and worcestershire, season with a little salt and pepper before serving


Enjoy!
JP